


Football/Soccer Session (Academy Sessions): [UEFA B] - Defending the Switch of Play (1) (Spec & SSG) - Martin Roberts

FAW Coach Ed
Martin Roberts
Profile Summary

| Name: | Martin Roberts |
|---|---|
| City: | Chester, England |
| Country: | United Kingdom |
| Membership: | Adult Member |
| Sport: | Football/Soccer |
Build 3D sessions in seconds
Access to 1000’s of sessions
Professionalise and modernise your coaching
Used by the world’s best coaches
US$
75
per year
Join today
Description
See the guidance at the top of this page to understand why you are not seeing interactive Football/Soccer images.
Learning Objectives

|
Technical Players must use the correct inside shoulder pressing angle to force the opponent to the touchline and maintain disciplined body shape to cut off multiple passing options simultaneously. |

|
Tactical The unit must execute a coordinated press on the ball carrier while sliding collectively to block critical central and wide passing lanes, specifically to prevent the switch of play. |

|
Physical This demands immediate, explosive bursts to close down the ball carrier (Yellow #8/ #6) and repeated, sharp lateral shuffling movements to maintain a compact defensive line. |

|
Psychological Requires high concentration to track off-ball runners and block passing lanes, and the discipline to trust teammates and maintain shape rather than committing too early. |

|
Social Clear and audible verbal communication is critical for triggering the press and coordinating the immediate slide of the defensive unit to maintain defensive connection and balance. |

See the guidance at the top of this page to understand why you are not seeing interactive Football/Soccer images.
Learning Objectives
|
|
Technical This requires disciplined jockeying technique from the 1st defender (Yellow #3) using the inside shoulder to force the attacker to the outside, and precise footwork during recovery runs. |
|
|
Tactical The unit must execute an immediate collective recovery slide across the pitch, correctly rotating and assigning roles (jockey, cover, balance) to neutralize the space created by the switch. |
|
|
Physical This demands high-intensity anaerobic recovery sprints from the far-side players to get goalside of the ball, followed by the continuous, short lateral movements required for coordinated cover. |
|
|
Psychological Players must maintain discipline (especially the 1st defender) to delay the attack without diving in and demonstrate composure to maintain shape and read the final pass under time pressure. |
|
|
Social Loud, clear communication is vital for guiding the recovery run, designating who is now the 1st defender, and coordinating marking assignments (e.g., tracking runs into the box). |
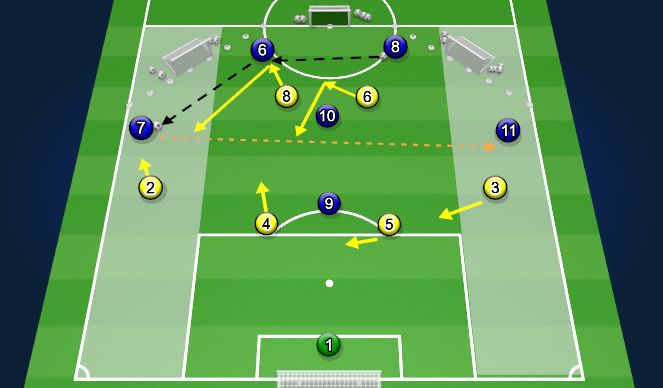
SSG - Defending the Switch of Play (10 mins)
- Setup:
- Half Field
- Tapered at one end with mini goals.
- Shaded zone can be marked off with cones
- Yellow (Out of Possession) playing 4-2-3-1, bring back #9
- Blue (In Possession) playing 4-3-3, bring back #1, #5
- No corners, play restarts with goal keeper from either goal. Normal game rules apply, including Offside.
Timings:
- 10 Mins
Who, What, When, Where, Why, What If?
- Who: Yellow Team
- What: A switch has been made, so Yellow must defend it.
- When: The Blue team find a way to switch play
- Where: Defensive third
- Why: Because Blue have exploited the open space left behind.
- What IF - Yellow team have moved too far over and left a lot of space for the Blue team to attack? Blue #11 receives the switched ball and begins to run with the ball towards the box
- Yellow #3 becomes 1st defender and must get body between the ball and the goal, doesn't run in, jockeys, stands sideways ready to intercept, shows the player outside by shaping his body and shoulder sideways.
- Yellow #5, second defender, drops a little deeper and provides cover for Yellow #3, but slightly behind Blue #10 shoulder so that he can see if the ball gets played to Blue #10 or the player dribbles past the defender.
- Yellow #4 as third defender provides balance, by tracking Blue #9 and getting touch tight, goalside
- Yellow #2 drops deep and balances out Yellow #4, while Yellow #8 picks up the run from Blue #7
- Blue #6 makes some advancement, but as a DCM, won't go too high, so is not a defensive priority
- Yellow #9 stays high and keeps Blue #5 busy
- Concurrent:
Using the coaching process, freeze play when something breaks down tactically, make some changes but keep them simple and quick so that ball rolling time stays high.
- Half field pitch, tapered towards the half way/center circle to replace the Yellow wingers
- If Blue can score after a switch of play, worth 2 goals.
- If Yellow #8 or #9 score, worth 2 goals.
Build 3D sessions in seconds
Access to 1000’s of sessions
Professionalise and modernise your coaching
Used by the world’s best coaches
US$
75
per year
Join today
'%3E%3Cpath id='path4169' d='M 11.4375,70.25 C 11.457031,38.394531 37.277344,13.242188 68.253906,13.050781 99.78125,12.855469 125.73047,38.351563 125.8125,70.078125 125.89844,101.62109 100.43359,127.14063 69.148438,127.42188 37.582031,127.70703 11.464844,102.23438 11.4375,70.25 m 6.425781,-0.08984 c 0.03516,28.421871 23.027344,50.69922 50.519532,50.82031 C 96.433594,121.10156 119.30469,98.367188 119.38281,70.359375 119.45313,42.878906 97.382813,19.714844 69.015625,19.496094 40.75,19.277344 17.964844,42.035156 17.863281,70.160156' style='clip-rule:nonzero;fill:%23333f48;fill-opacity:1;fill-rule:nonzero;stroke:none' /%3E%3Cpath style='fill:%23333f48;fill-opacity:1;fill-rule:nonzero;stroke:none' d='m 39.789063,108.62109 c 0.28125,0.14454 0.550781,0.32032 0.839843,0.4336 2.734375,1.05469 5.554688,1.78125 8.453125,2.23047 2.734375,0.42578 5.484375,0.64453 8.25,0.54297 3.988282,-0.15625 7.832032,-0.94922 11.445313,-2.69532 1.683594,-0.8164 3.246094,-1.82422 4.640625,-3.07422 3.265625,-2.92578 5.171875,-6.582027 5.796875,-10.906246 0.546875,-3.761719 0.04687,-7.425781 -1.09375,-11.019531 -1.4375,-4.523438 -3.730469,-8.582032 -6.703125,-12.265625 -1.03125,-1.277344 -2.082031,-2.535157 -3.113281,-3.808594 C 66.789063,66.1875 65.332031,64.269531 64.0625,62.21875 c -1.601562,-2.582031 -2.835937,-5.316406 -3.613281,-8.261719 -0.683594,-2.574218 -0.902344,-5.1875 -0.6875,-7.828125 0.214844,-2.617187 0.910156,-5.117187 2.152344,-7.441406 2.164062,-4.050781 5.503906,-6.710937 9.816406,-8.179687 1.890625,-0.640625 3.835937,-1.058594 5.832031,-1.195313 1.121094,-0.07813 2.242188,-0.152344 3.363281,-0.164062 4.28125,-0.02734 8.4375,0.734375 12.453125,2.175781 1.871094,0.671875 3.6875,1.496094 5.523438,2.257812 0.226562,0.09375 0.4375,0.230469 0.664062,0.351563 -0.164062,0.25 -0.371093,0.160156 -0.539062,0.164062 -2.824219,0.101563 -5.535156,0.703125 -8.132813,1.804688 -1.335937,0.570312 -2.570312,1.316406 -3.648437,2.296875 -2.527344,2.296875 -3.605469,5.15625 -3.34375,8.550781 0.140625,1.855469 0.722656,3.574219 1.550781,5.222656 0.648438,1.296875 1.414063,2.523438 2.292969,3.675782 0.953125,1.25 1.929687,2.484375 2.929687,3.699218 2.085938,2.523438 4.164063,5.054688 6.050782,7.738282 2.203125,3.136718 4.140627,6.417968 5.589847,9.980468 1.16406,2.867188 2.01562,5.820313 2.39843,8.894532 0.25,2.011718 0.30079,4.03125 0.11719,6.058593 -0.24219,2.640625 -0.79297,5.195313 -1.74609,7.667969 -1.29688,3.36328 -3.300784,6.22656 -5.972659,8.63281 -2.429687,2.19141 -5.171875,3.90625 -8.109375,5.3125 -2.695312,1.29297 -5.464843,2.40235 -8.34375,3.20313 -1.953125,0.54687 -3.945312,0.8789 -5.949218,1.15625 -3.035157,0.41797 -6.085938,0.48828 -9.132813,0.3125 -5.328125,-0.3125 -10.476562,-1.46094 -15.410156,-3.52344 -3.449219,-1.44141 -6.691406,-3.25781 -9.757813,-5.39453 -0.183593,-0.12891 -0.378906,-0.25 -0.53125,-0.41016 -0.07031,-0.0703 -0.05859,-0.22656 -0.08203,-0.34375 z m 0,0' id='path4175' /%3E%3Cpath style='fill:%23333f48;fill-opacity:1;fill-rule:nonzero;stroke:none' d='M 94.699219,29.390625 C 94.089844,29.21875 93.476563,29.054688 92.867188,28.875 90.183594,28.085938 87.46875,27.441406 84.703125,27.046875 c -3.976562,-0.566406 -7.945312,-0.59375 -11.863281,0.402344 -7.535156,1.914062 -12.386719,6.71875 -14.878906,13.996094 -0.894532,2.617187 -1.179688,5.328125 -0.953125,8.078125 0.203125,2.484375 0.867187,4.859375 1.816406,7.160156 0.933594,2.261719 2.117187,4.390625 3.4375,6.449219 1.4375,2.25 3.050781,4.371093 4.640625,6.511718 1.4375,1.933594 2.867187,3.871094 4.261719,5.835938 1.230468,1.730469 2.316406,3.546875 3.273437,5.445312 1.324219,2.625 2.265625,5.378907 2.703125,8.292969 0.433594,2.902344 0.292969,5.765625 -0.660156,8.5625 -0.9375,2.74609 -2.574219,5.00781 -4.777344,6.875 -2.417969,2.04688 -5.203125,3.39844 -8.246094,4.22266 -1.835937,0.5 -3.703125,0.75781 -5.609375,0.82031 -3.886718,0.13281 -7.679687,-0.47266 -11.421875,-1.46094 -2.261718,-0.59765 -4.488281,-1.33203 -6.695312,-2.11328 -0.207031,-0.0742 -0.40625,-0.16797 -0.597656,-0.25 -0.02344,-0.24609 0.148437,-0.19141 0.25,-0.20703 1.96875,-0.30469 3.921875,-0.67969 5.804687,-1.34766 1.367188,-0.48437 2.671875,-1.10156 3.855469,-1.94922 2.25,-1.61328 3.65625,-3.765621 4.0625,-6.515621 0.273437,-1.867188 0.09375,-3.710938 -0.429688,-5.527344 -0.472656,-1.648437 -1.171875,-3.199219 -2.109375,-4.628906 -0.792968,-1.207031 -1.636718,-2.382813 -2.523437,-3.519531 -0.921875,-1.195313 -1.921875,-2.328125 -2.890625,-3.484375 -2.753906,-3.273438 -5.351563,-6.660157 -7.523438,-10.355469 -2.042968,-3.480469 -3.667968,-7.136719 -4.597656,-11.078125 -0.640625,-2.699219 -0.980469,-5.4375 -0.832031,-8.214844 0.238281,-4.53125 1.476562,-8.78125 3.824219,-12.6875 1.082031,-1.800781 2.445312,-3.375 3.988281,-4.800781 2.742187,-2.527344 5.863281,-4.480469 9.257812,-5.992188 3.746094,-1.667968 7.652344,-2.769531 11.707032,-3.394531 3.152343,-0.488281 6.324218,-0.671875 9.507812,-0.519531 8.632813,0.410156 16.671875,2.792969 24,7.433594 0.08203,0.05078 0.152344,0.109375 0.230469,0.167968 -0.0039,0.04297 -0.0078,0.08984 -0.01563,0.136719' id='path4177' /%3E%3Cpath style='fill:%23333f48;fill-opacity:1;fill-rule:nonzero;stroke:none' d='m 31.699219,38.75 c -0.07813,0.238281 -0.152344,0.476563 -0.238281,0.710938 -1.460938,4.074218 -2.066407,8.28125 -1.808594,12.59375 0.4375,7.304687 2.808594,13.925781 7.277344,19.753906 3.714843,4.84375 7.441406,9.671875 11.167968,14.503906 1.113282,1.441406 1.953125,3.007813 2.414063,4.777344 0.332031,1.257812 0.425781,2.539062 0.273437,3.820312 -0.214843,1.832032 -1.070312,3.34375 -2.464843,4.546875 -0.984375,0.851559 -2.113282,1.449219 -3.316407,1.925779 -1.378906,0.54297 -2.8125,0.89063 -4.273437,1.1211 -2.226563,0.35547 -4.46875,0.46093 -6.722656,0.41015 -0.589844,-0.0156 -1.046875,-0.18359 -1.433594,-0.625 -0.636719,-0.72265 -1.335938,-1.39062 -1.9375,-2.14062 C 25.574219,93.800781 22.300781,86.621094 20.84375,78.636719 20.152344,74.835938 19.917969,71 20.15625,67.128906 20.796875,56.773438 24.390625,47.574219 30.859375,39.480469 c 0.21875,-0.273438 0.453125,-0.53125 0.679688,-0.796875 0.05469,0.02344 0.109375,0.04297 0.160156,0.06641' id='path4179' /%3E%3Cpath style='fill:%23333f48;fill-opacity:1;fill-rule:nonzero;stroke:none' d='m 105.41016,101.30078 c -0.13282,-0.3125 0.0234,-0.5039 0.0977,-0.69922 1.38672,-3.749997 1.98047,-7.628904 1.89844,-11.621091 -0.14453,-6.84375 -2.08594,-13.144531 -5.73437,-18.925781 C 99.890625,67.226563 97.917969,64.53125 95.835938,61.917969 94.4375,60.160156 92.988281,58.4375 91.582031,56.6875 90.632813,55.511719 89.6875,54.335938 88.792969,53.121094 c -0.835938,-1.144531 -1.488281,-2.398438 -1.953125,-3.742188 -0.523438,-1.515625 -0.695313,-3.070312 -0.511719,-4.652343 0.21875,-1.839844 1.082031,-3.339844 2.476563,-4.542969 1.039062,-0.890625 2.230468,-1.507813 3.503906,-1.980469 1.632812,-0.609375 3.320312,-0.960937 5.046875,-1.175781 1.917969,-0.238281 3.839841,-0.269531 5.769531,-0.230469 0.52734,0.01172 0.89453,0.203125 1.23828,0.585938 5.50391,6.113281 9.26172,13.144531 11.21875,21.132812 1.11719,4.554688 1.5625,9.179688 1.30469,13.855469 -0.58203,10.625 -4.23438,20.082031 -10.96094,28.339846 -0.15625,0.1914 -0.32812,0.375 -0.51562,0.58984' id='path4181' /%3E%3Cpath style='fill:%23333f48;fill-opacity:1;fill-rule:nonzero;stroke:none' d='m 39.796875,108.63281 c -0.05859,0.0117 -0.117187,0.0234 -0.175781,0.0352 0.05469,-0.0156 0.113281,-0.0312 0.167969,-0.0469 z m 0,0' id='path4183' /%3E%3C/g%3E%3C/svg%3E)
 Play animation
 Play step-by-step
 Repeat (toggle)
 Full Screen
 Pause
Pause Stop
Stop
Specific - Defend the Switch fo Play (10 mins)
Setup:
Timings:
Who, What, Where, When, Why, What If?
Block 1:
At the same time, the pass to Blue #7 is the trigger for Yellow #2 to apply pressure to the inside shoulder, to force Blue #7 to face outside, towards the byline.
Interventions:
At the start, discuss the shape and movement of the Yellow team, explain the bonus goals to the Blue team.
Using the coaching process, stop play and correct the players so they recognise where their positioning should be.
Explain at the end of the practice, which players are joining and where.
Conditions:
Challenges: